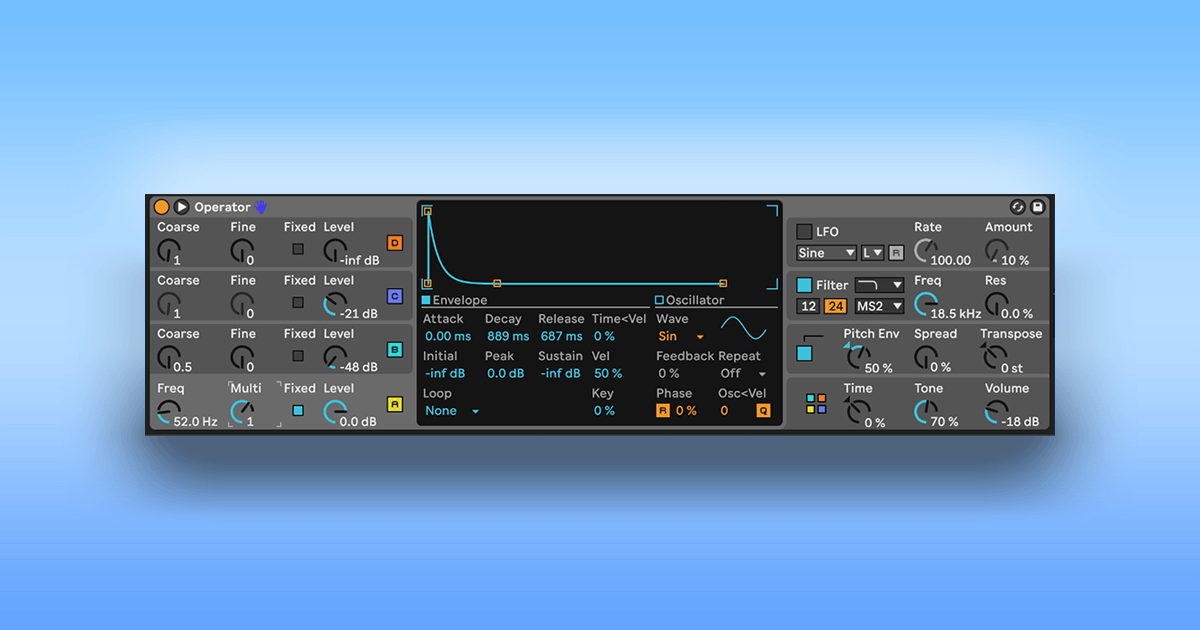
Select waveform and algorithm
First, we need to choose the right algorithm. The fourth algorithm from the left is particularly well suited for this, as it has two outputs routed in parallel, each of which may be manipulated by the carriers. Following that, we select the suitable waveform for the first carrier (operator A), the fundamental sound. I would prefer a sine wave for this because it is the clearest wave of all and provides pure bass without any harmonics. And that’s what we aim for the fundamental. We may add a second oscillator eventually or modify the FM Amount to introduce overtones later on, but for the fundamental, a pure sine wave is enough.
Set frequency
Following that, we utilize the incredibly handy fixed frequency function provided by Operator. With this feature, Operator just plays the fixed frequency you select, not the notes you send it as a midi signal. Frequencies between 48 and 55 hertz are ideal for creating techno kick drums. These deliver the appropriate sub and punch when heard through club PAs. Personally, I love kicks in G#, which is 52Hz, but that is just my opinion. Try a few different things and see what works best for you.
Amp envelope
Now, if you play a midi pattern, such as a simple 4/4 pattern, you should hear a continuous tone according to the frequency you chose. The amplitude envelope and the pitch envelope must be changed for this tone to mimic a kick. Because a kick drum begins at the loudest point and gradually becomes quieter, we must imitate this characteristic with the help of the amplitude envelope. We want no attack, no sustain, and pretty quick decay (600-800ms) as well as a brief release for this. You may play around with decay and release times until you find what works best for you. Personally, I like short kicks since they are more compatible with bass lines and hence fit better into the groove.
Pitch modulation
All we need now is pitch modulation, which we can generate with the pitch envelope, to create the distinctive kick sound. To do this, we activate the pitch envelope and route it to operator A. The pitch drop is then generated using a rapid adsr curve. There is also no attack, a brief decay (200-300ms), and a very short release. The only thing left is to define the pitch automation height, which is done with the parameters “beginning” and “peak.” Because the pitch of a kick, like the volume, begins at the highest point and subsequently flattens out, the greatest values (48st) may be applied for both parameters. The pitch envelope amount may now be used to specify the amount of modulation desired. For my taste, the sweet spot is around 50, but experiment and see for yourself. This applies not just to the amount, but also the envelopes; simply experiment until you find your sweet spots.
Introducing white noise and FM
To add interest to the somewhat dry-sounding kick, you can now add white noise via the second output (operation C) to replicate the click. Simply choose white noise as the waveform and configure the amp envelope to have a very short decay (20-60ms) with no attack or release. You may now add the proper amount of click by increasing the volume of the oscillator.
You may add some FM modulation to introduce even more upper harmonics by blending oscillator B in.
Processing
Once you’ve created a solid foundation, you may now apply as many effects as you like to appropriately shape and drive the kick. You may even experiment with other filter algorithms in operator itself, for example, to push the sound even further. After that, you may add other effects till you’re satisfied with the kick. The typical effects for this would be EQ, compression, saturation, and perhaps some reverb, but there are no creative limitations as long as it pleases you.
In general, it is rather easy to synthesize a kick drum, and with little practice, anyone can build a whole library of usable kicks. The fundamental principle may also be used for any synthesizer that supports amp and pitch modulation. So just play around a little and experiment!